What is State Management
State Management using BLoC:State management is one of the most popular and necessary processes in the lifecycle of an application. By official documentation, Flutter is declarative. It means Flutter builds its UI by reflecting the current state of your app.
To manage the large size of applications we must need to manage states. There are many state management libraries in flutter such as Provider, BLoC, Redux, GetX etc..
In this blog, we will talk about BLoC Architecture.
State Management using BLoC
What is BLoC?
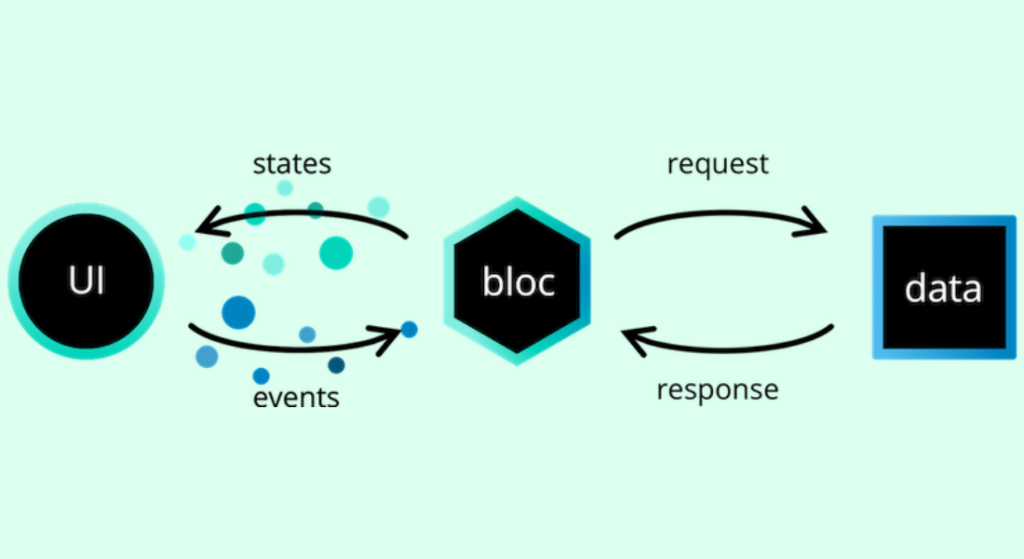
BLoC stands for Business Logic Components. It’s a state management system for Flutter recommended by Google developers. It helps in managing the state and makes access to data from a central place in your project.It aims to separate the application’s business logic from User Interface, making the application code more unambiguous, scalable, and testable.
Pros of Using BLoC
- Excellent documentation about different scenarios.
- Separates business logic from the UI hence making the code easy to understand.
- Makes the product more testable.
- Easy to keep track of states an app went through.
Cons of Using BLoC
- The learning curve is a bit steep.
- Not recommended for simple applications
- More boilerplate code, but that can be take care of by extensions.
Flutter BLoC Tutorial
1. Make sure to install the bloc extension in your editor; it will help create all boilerplate code and files requires for the project(right-click on the lib folder, and it will give you the option for generation bloc for your project).
2. Make sure to match your pubspec.yaml file with mine to avoid any issues.
It will give you the option for a generation bloc for your project.
dependencies:
  flutter_bloc: ^8.1.3
Events and States:
To understand how bloc works, we need to know what are events and states.
- Events: events are an application’s inputs (like button_press to load images, text inputs, or any other user input that our app may hope to receive).
- States: States are simply the application’s state, which can be change in response to the event received.

Creating an Event
@immutable
abstract class AppBlocEvent {
 const AppBlocEvent();
}

@immutable
class ChangeTextEvent extends AppBlocEvent {
 const ChangeTextEvent();}
Moving forward in the flutter bloc tutorial. Here we have created a ChangeTextEvent, which will be fired when a button is clicked.
We have an abstract AppBlocEvent class because Bloc expects a single event to be added to the stream. Still, as there can be multiple events in an app, we create an abstract class and extend it whenever we want to create any new event for handling and passing multiple events to the bloc.
@immutable
class AppState extends Equatable {
 final int index;
 final String text;

 const AppState.empty()
     : index = 0,
       text = 'Initial Text';

 const AppState({
   required this.index,
   required this.text,
 });

 @override
 List<Object> get props => [index, text];
}
Similarly, we can create different states here in this app. We do not have many states. Therefore, we creates a single state to manage the app; however, we can create multiple states similar to events by creating an abstract appstate and extending it to our custom states.
- AppState.empty is simply the initial state with the application loads initially.
- Equatable (get props) here is to compare to states. If they are equal, it will be use in testing the bloc.
Event and State Management using BLoC Pattern
class AppBlocBloc extends Bloc {
 final List textList = [
   'Initial Text',
   'Changed Text',
   'Changed Again',
 ];
 AppBlocBloc() : super(const AppState.empty()) {
   on((event, emit) {
     try {
       int newIndex = state.index + 1;
       if(newIndex >= textList.length) {
         newIndex = 0;
       }
       emit(
         AppState(
           index: newIndex,
           text: textList[newIndex],
         ),
       );
     } on Exception catch (e) {

       print(e);
     }
   });
 }
}
This is the part that contains the business logic of our application.
- on execute when ChangeTextEvent is added to the stream via a button click , it receives the event, i.e., any information that you want to pass along with triggering event you can access it using this(like event.any_info – you have to change your event class accordingly), emit which use to emit a state for that particular event.
- state.index lets you access the current state of the application.
- emit(AppState(…)): emit(…) is used to output new states and causes the rebuild of the build() function.
Providing our BLoC
import 'package:flutter/material.dart';
import 'package:flutter_bloc/flutter_bloc.dart';
import 'package:text_change/text_controller.dart';
import 'bloc/app_bloc_bloc.dart';
import 'bloc/app_bloc_state.dart';

class App extends StatelessWidget {
  const App({Key? key}) : super(key: key);

  @override
  Widget build(BuildContext context) {
    return MaterialApp(
      title: 'Flutter Demo',
      theme: ThemeData(
        primarySwatch: Colors.blue,
      ),
      home: BlocProvider(
        create: (context) => AppBlocBloc(),
        child: Scaffold(
          appBar: AppBar(
            title: const Text('Text Change'),
          ),
          body: BlocConsumer(
            listener: (context, state) {},
            builder: (context, state) {
              return TextController(
                text: state.text,
              );
            },
          ),
        ),
      ),
    );
  }
}
BlocProvider( ): we use it to provides an instance of our bloc by placing it just below the root of the application so that it is accessible throughout it.
- create: it creates the instance of our AppBloBloc.
BlocConsumer( ): It is the area where everything happens.
- It has a property called listener, which listens for state changes and can react in a particular way to a specific state along with state change.
- builder: it is responsible for building the UI and is rebuilt for each state change. blocConsumer also contains listenWhen and buildWhen, which as the name states, can tailores to react to specify states.
class TextChangeController extends StatelessWidget {
final String text;

const TextChangeController({Key? key, required this.text}) : super(key: key);

@override
Widget build (BuildContext context) {
      return Column
         children:  [
            TextChange(
               text: text,
            ),
           ElevatedButton(
               onPressed: () =>
                    context.read().add(const ChangeTextEvent()),
              child: const Text('Change Text'),
         ),
      ),
   );
  )
)
we have added ChangetTextEvent onto the event stream, thereby triggering state change which causes the rebuild of the builder() in BlocConsumer, and changed text is displayed up on the screen.
Testing the BLoC Design Pattern
For testing the bloc, you require two packages:
- bloc_test
- flutter_test
Simply inside the test folder, create the app_bloc_test.dart file and start writing test.
Inside we are going to test two conditions:
- Initial state of application i.e AppState.empty().
- State changes when the button is press.
void main() {
 blocTest(
   'Initial State',
   build: () => AppBlocBloc(),
   verify: (appState) =>
       expect(appState.state, const AppState.empty(), reason: 'Initial State'),
 );
 blocTest(
   'emits [MyState] when MyEvent is added.',
   build: () => AppBlocBloc(),
   act: (bloc) => bloc.add(const ChangeTextEvent()),
   expect: () => const [
     AppState(
       index: 1,
       text: 'Changed Text',
     ),
   ],
 );
}- blocTest is coming from the bloc_test package.
- build(): it returns an instance of AppBlocBloc().
- verify and expect as the name suggests they match the state expect(actual, matcher, reason).
- act: To add an event onto the event stream.
BlocProvider(…)
we use it to provide an instance of our bloc by placing it just below the root of the application so that it is accessible throughout it.
BlocListner(…)
It is the portion where everything management of states happens.
- It has a property called listener, which listens for state changes and can react in a particular way to a specific state along with state change.
For More: To know about Flutter State Management Using Provider
Conclusion
The Flutter BLoC is helpful for you to get starts with state management using the BLoC pattern. From this blog, we learned about the Authentication of users in a simple way By BLoC Architecture.


Leave a Reply