
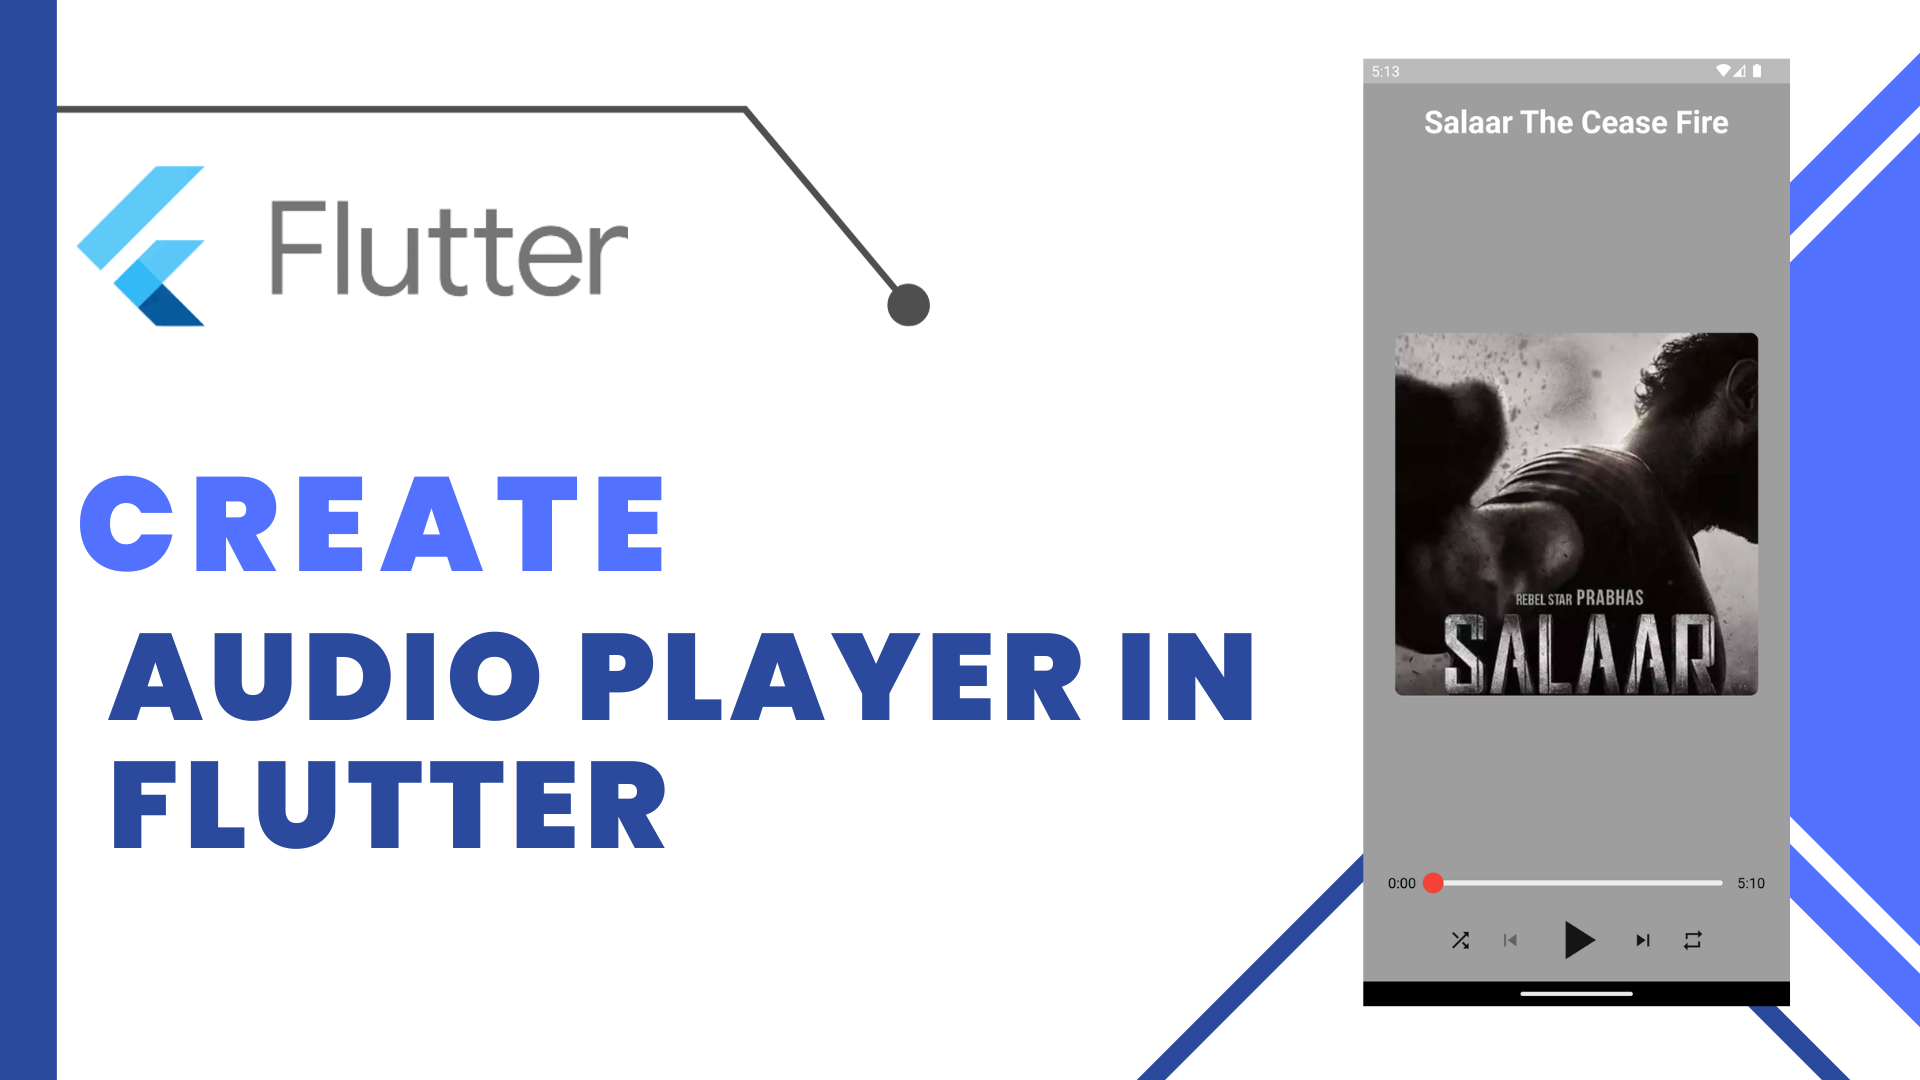
Audio Player in Flutter:Music can inspire and motivate us, it makes every person feel enthusiastic and relax. In this article, we will explain how to build a Music Player application step by step with some basic functionalities like pause, play, and seek in Flutter from a music URL. Flutter is an open-source framework developed and support by Google to build and deploy hybrid applications easily.
Follow these steps to create a brand new project to make building the app.
- Create and name a folder of your choice.
- Open VS Code and open the newly created folder in it.
- Open the command palette by pressing CTRL + SHIFT + P and type Flutter. Choose Flutter: New Project from the listed options.
Step-by-Step Implementation
Step 1:
After the initial setup of the project,
Open main.dart file from the lib folder.
Step 2:
Add the following required packages in the pubspec.yaml file just below the dependencies section which we are going to use in our app.
- just_audio: (For audio streaming)
- audio_video_progress_bar: (For progress bar UI)
Step 3:
Create a new file named player_screen.dart in the lib folder.
Step 4:
Import the material file using the following statement in the newly create file.
import 'package:flutter/material.dart';Import the below files for the working of the application.
import 'package:just_audio/just_audio.dart';
import 'package:audio_video_progress_bar/audio_video_progress_bar.dart';
Step 5:
Open the AndroidManifest.xml file which is available under the android/app/src/main folder.
Add the following line above the <application> tag to give the app internet permission for loading music.
<uses-permission android:name="android.permission.INTERNET" />Step 6:
Open application-level build.gradle file which is available under the android/app folder and change the minSdkVersion to 21.
minSdkVersion 21Step 7:
Create a StateFul Widget named PlayerScreen in the player_screen.dart file.
Step 8:
Get an audio file URL that you want to play in the app. Ensure that the URL contains a valid music extension format like mp3. Also, get an image URL for showing the thumbnail image of the song that is being play.
Step 9:
Add the following Dart code into the Stateful Widget above the build method. Add requires URLs.
- loadMusic() function is used to load the specified music file from the internet.
- playMusic() function is used to play the music.
- pauseMusic() function is used to pause the music.
Step 10:
Now we will design the UI of the music player. Here are the steps in designing each Widget. The equivalent Dart code is mentioned below the steps.
- An AppBar is add with the title Music Player.
- A Column Widget is add and under children below widgets is add.
- A Network Image to load the thumbnail image mention from the URL .
- Below it after a Spacer, a ProgressBar is add to show the music progress and use it as a slider for seeking forward and backward.
- ProgressBar is wrap with StreamBuilder to get stream updates from the music player and update the current progress of music play.
- A Row Widget is take and the following children are add to it.
- An IconButton is add in the middle of the row for Pausing/Playing the music.
- Two Seek buttons are add at both sides of the Pause button to seek backward and forward. Currently, music is see for 10 seconds, you can update it as per your preference.
import 'package:flutter/material.dart';

void main() {
  runApp(const MyApp());
}

class MyApp extends StatelessWidget {
  const MyApp({super.key});

  @override
  Widget build(BuildContext context) {
    return const MaterialApp(
      home: PlayerScreen(),
      debugShowCheckedModeBanner: false,
      title: "Music Player",
    );
  }
}
Full Code:Audio Player in Flutter
import 'package:audio_video_progress_bar/audio_video_progress_bar.dart';
import 'package:flutter/material.dart';
import 'package:just_audio/just_audio.dart';


class Player extends StatefulWidget {
  @override
  _PlayerState createState() => _PlayerState();
}

class _PlayerState extends State<Player> {
  late AudioPlayer _audioPlayer;
  String thumbnailImgUrl =
      "https://assets.thehansindia.com/h-upload/2023/09/06/1378161-salaar.webp";


  @override
  void initState() {
    super.initState();
    _audioPlayer = AudioPlayer();

    _audioPlayer
        .setAudioSource(ConcatenatingAudioSource(children: [
      AudioSource.asset('assets/audio/Arivaai-MassTamilan.dev.mp3'),
      AudioSource.asset('assets/audio/Pala-Kadhaiyil-MassTamilan.dev.mp3'),
      AudioSource.asset(
          'assets/audio/Suriyan-Kudaiya-Neetti-MassTamilan.dev.mp3'),
      AudioSource.uri(
        Uri.parse(
            "https://archive.org/download/IGM-V7/IGM%20-%20Vol.%207/25%20Diablo%20-%20Tristram%20%28Blizzard%29.mp3"),

      ),
      AudioSource.uri(
        Uri.parse(
            "https://archive.org/download/igm-v8_202101/IGM%20-%20Vol.%208/15%20Pokemon%20Red%20-%20Cerulean%20City%20%28Game%20Freak%29.mp3"),

      ),
      AudioSource.uri(
        Uri.parse(
            "https://scummbar.com/mi2/MI1-CD/01%20-%20Opening%20Themes%20-%20Introduction.mp3"),

      ),
    ]))
        .catchError((error) {
      // catch load errors: 404, invalid url ...
      print("An error occured $error");
    });
  }

  @override
  void dispose() {
    _audioPlayer.dispose();
    super.dispose();
  }

  @override
  Widget build(BuildContext context) {
    return Scaffold(
      body: Center(
        child: PlayerButtons(_audioPlayer),
      ),
    );
  }
}

class PlayerButtons extends StatelessWidget {
  PlayerButtons(this._audioPlayer, {Key? key}) : super(key: key);

  final AudioPlayer _audioPlayer;
  bool loaded = false;

  @override
  Widget build(BuildContext context) {
    return SafeArea(
      child: Container(
        color: Colors.grey,
        child: Column(
          children: [
            Padding(
              padding: const EdgeInsets.all(20),
              child: Text(
                "Salaar The Cease Fire",
                style: TextStyle(
                    fontSize: 30,
                    fontWeight: FontWeight.bold,
                    color: Colors.white),
              ),
            ),
            const Spacer(
              flex: 1,
            ),
            ClipRRect(
              borderRadius: BorderRadius.circular(8),
              child: Image.network(
                'https://assets.thehansindia.com/h-upload/2023/09/06/1378161-salaar.webp',
                height: 350,
                width: 350,
                fit: BoxFit.cover,
              ),
            ),
            const Spacer(),
            Padding(
              padding: const EdgeInsets.symmetric(horizontal: 8),
              child: Column(
                children: [
                  StreamBuilder(
                      stream: _audioPlayer.positionStream,
                      builder: (context, snapshot1) {
                        final Duration duration = loaded
                            ? snapshot1.data ?? Duration.zero
                            : Duration.zero;

                        return StreamBuilder(
                            stream: _audioPlayer.bufferedPositionStream,
                            builder: (context, snapshot2) {
                              final Duration bufferedDuration = loaded
                                  ? snapshot2.data ?? Duration.zero
                                  : Duration.zero;

                              return SizedBox(
                                height: 30,
                                child: Padding(
                                  padding: const EdgeInsets.symmetric(
                                      horizontal: 16),
                                  child: ProgressBar(
                                      progress: snapshot1.data ?? Duration.zero,
                                      // duration,
                                      total: _audioPlayer.duration ??
                                          Duration.zero,
                                      buffered: bufferedDuration,
                                      timeLabelLocation:
                                          TimeLabelLocation.sides,
                                      timeLabelPadding: -1,
                                      timeLabelTextStyle: const TextStyle(
                                          fontSize: 14, color: Colors.black),
                                      progressBarColor: Colors.red,
                                      baseBarColor: Colors.grey[200],
                                      bufferedBarColor: Colors.grey[350],
                                      thumbColor: Colors.red,
                                      onSeek: (loaded) async {
                                        await _audioPlayer.seek(loaded);
                                      }

                                      ),
                                ),
                              );
                            });
                      }),
                ],
              ),
            ),
            Container(
              child: Column(
                children: [
                  Row(
                    mainAxisSize: MainAxisSize.min,
                    children: [
                      StreamBuilder<bool>(
                        stream: _audioPlayer.shuffleModeEnabledStream,
                        builder: (context, snapshot) {
                          return _shuffleButton(
                              context, snapshot.data ?? false);
                        },
                      ),
                      StreamBuilder<SequenceState?>(
                        stream: _audioPlayer.sequenceStateStream,
                        builder: (_, __) {
                          return _previousButton();
                        },
                      ),
                      StreamBuilder<PlayerState>(
                        stream: _audioPlayer.playerStateStream,
                        builder: (_, snapshot) {
                          final playerState = snapshot.data;
                          return _playPauseButton(playerState);
                        },
                      ),
                      StreamBuilder<SequenceState?>(
                        stream: _audioPlayer.sequenceStateStream,
                        builder: (_, __) {
                          return _nextButton();
                        },
                      ),
                      StreamBuilder<LoopMode>(
                        stream: _audioPlayer.loopModeStream,
                        builder: (context, snapshot) {
                          return _repeatButton(
                              context, snapshot.data ?? LoopMode.off);
                        },
                      ),
                    ],
                  ),
                  _controlButton(),
                ],
              ),
            ),
          ],
        ),
      ),
    );
  }

  Widget _controlButton() {
    return Padding(
      padding: const EdgeInsets.symmetric(horizontal: 20),
      child: Column(
        children: [
          StreamBuilder(
              stream: _audioPlayer.speedStream,
              builder: (context, snapshot1) {
                return Row(
                  children: [
                    Icon(Icons.speed),
                    Slider(
                        min: 1,
                        max: 3,
                        divisions: 3,
                        thumbColor: Colors.red,
                        activeColor: Colors.red,
                        inactiveColor: Colors.grey[200],
                        value: snapshot1.data ?? 1,
                        onChanged: (value) async {
                          await _audioPlayer.setSpeed(value);
                        })
                  ],
                );
              }),
          StreamBuilder(
              stream: _audioPlayer.volumeStream,
              builder: (context, snapshot1) {
                return Row(
                  children: [
                    Icon(Icons.volume_down),
                    Slider(
                        min: 0,
                        max: 3,
                        divisions: 4,
                        thumbColor: Colors.red,
                        activeColor: Colors.red,
                        inactiveColor: Colors.grey[200],
                        value: snapshot1.data ?? 1,
                        onChanged: (value) async {
                          await _audioPlayer.setVolume(value);
                        })
                  ],
                );
              })
        ],
      ),
    );
  }

  _playPauseButton(PlayerState? playerState) {
    final processingState = playerState?.processingState;
    if (processingState == ProcessingState.loading ||
        processingState == ProcessingState.buffering) {
      return Container(
        margin: EdgeInsets.all(8.0),
        width: 64.0,
        height: 64.0,
        child: CircularProgressIndicator(),
      );
    } else if (_audioPlayer.playing != true) {
      return IconButton(
        icon: Icon(Icons.play_arrow),
        iconSize: 64.0,
        onPressed: _audioPlayer.play,
      );
    } else if (processingState != ProcessingState.completed) {
      return IconButton(
        icon: Icon(Icons.pause),
        iconSize: 64.0,
        onPressed: _audioPlayer.pause,
      );
    } else {
      return IconButton(
        icon: Icon(Icons.replay),
        iconSize: 64.0,
        onPressed: () => _audioPlayer.seek(Duration.zero,
            index: _audioPlayer.effectiveIndices!.first),
      );
    }
  }

  Widget _shuffleButton(BuildContext context, bool isEnabled) {
    return IconButton(
      icon: isEnabled
          ? Icon(Icons.shuffle, color: Theme.of(context).colorScheme.secondary)
          : Icon(Icons.shuffle),
      onPressed: () async {
        final enable = !isEnabled;
        if (enable) {
          await _audioPlayer.shuffle();
        }
        await _audioPlayer.setShuffleModeEnabled(enable);
      },
    );
  }

  Widget _previousButton() {
    return IconButton(
      icon: Icon(Icons.skip_previous),
      onPressed: _audioPlayer.hasPrevious ? _audioPlayer.seekToPrevious : null,
    );
  }

  Widget _nextButton() {
    return IconButton(
      icon: Icon(Icons.skip_next),
      onPressed: _audioPlayer.hasNext ? _audioPlayer.seekToNext : null,
    );
  }

  Widget _repeatButton(BuildContext context, LoopMode loopMode) {
    final icons = [
      Icon(Icons.repeat),
      Icon(Icons.repeat, color: Theme.of(context).colorScheme.secondary),
      Icon(Icons.repeat_one, color: Theme.of(context).colorScheme.secondary),
    ];
    const cycleModes = [
      LoopMode.off,
      LoopMode.all,
      LoopMode.one,
    ];
    final index = cycleModes.indexOf(loopMode);
    return IconButton(
      icon: icons[index],
      onPressed: () {
        _audioPlayer.setLoopMode(
            cycleModes[(cycleModes.indexOf(loopMode) + 1) % cycleModes.length]);
      },
    );
  }
}
For more: To know about Webview in Flutter
Leave a Reply